Friday 29 March 2013

Lake District 121 - Post Processing

One of the things I was keen to learn from Paul Gallagher during my recent workshop in The Lake District, was the art, and it is an art, of post processing a RAW file to produce a strong black and white image.

Up until my trip away I had used a combination of Lightroom and Silver Efex Pro2. Rarely would I use Photoshop even though it's regarded as the 'daddy' of all software programs for image editing. Lightroom shares the same Raw converter as Photoshop and is a wonderful tool for your photographic workflow, from importing the images, key-wording, developing and finally to print or uploading to the web. However it does not touch Photoshop when it comes to the fine art of processing a really good black and white image. However I was daunted by the fact that the skills and knowledge to use Photoshop well, take a long time, so I was delighted when Paul demonstrated a few simple techniques which with a little practice I have now been able to apply to the shots I took on the trip.

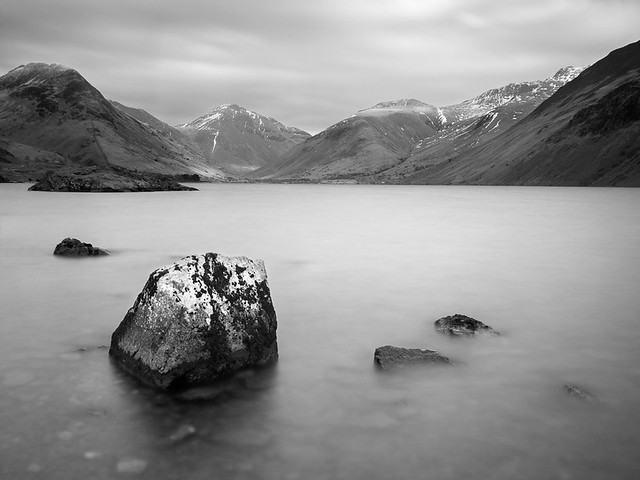
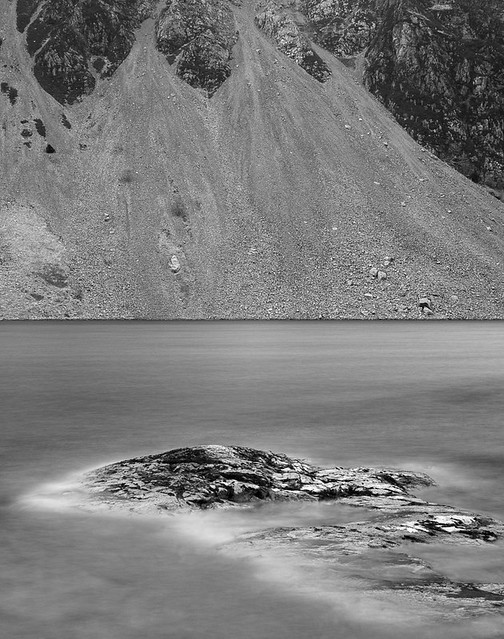
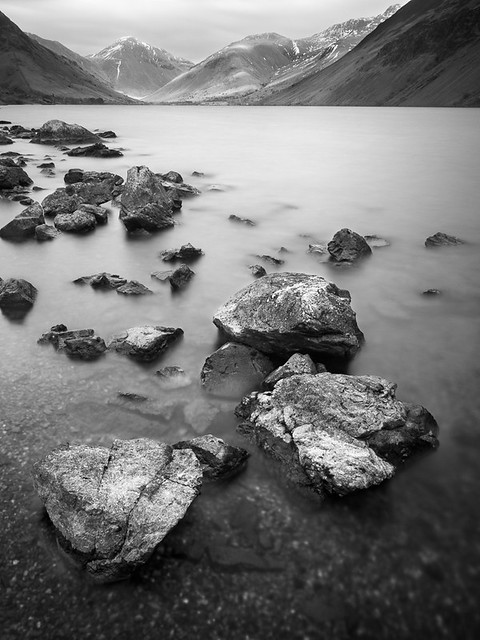
In the following example the first image on the left is the original RAW file with no adjustments. It's just as it was when imported from the SD card into Lightroom. The reason for the blue colour cast is down to the fact that this was a 60second long exposure using the Hi-Tech 10 stop ND filter. The second image on the right has simply been converted to black and white and whilst the blue cast has been removed, the image is very flat. The third image is the finished photograph.


20130222-P2220098-2.jpg
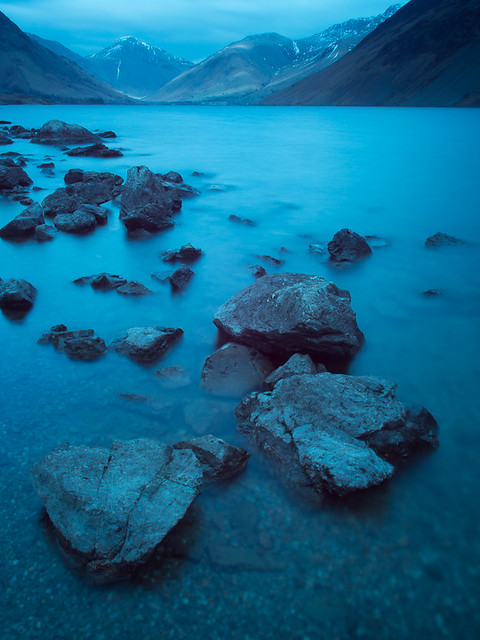
RAW file - straight out of the camera


20130222-P2220098.jpg
RAW file with simple black and white conversion


Wastwater Rocks
Wastwater Rocks - the final image

So what simple steps were taken in Photoshop to arrive at this end result? 

Well, firstly in Lightroom I applied a preset which boosted the clarity to a value of 15 and which also applied some sharpening. Amount 50 - Radius 0.5 - Detail 50 and Masking 0. The preset also eliminates any chromatic aberration   created by the lens I used for this shot - the Panasonic f2.8 12 - 35mm. On this occasion CA would not have been visible given the blue colour cast.

Secondly I exported the image from Lightroom into Photoshop CS5. Using 'image - adjustment' I then converted the RAW image to black and white. This was followed by a 'levels' adjustment layer to move the black and white points on the histogram, to give a full range of tonal values. The 'mid point' can also be adjusted if required but was not changed for this particular shot. 

The next stage was to make local adjustments to certain sections or specific areas of the image using the lasso tool to select the area and then apply a curves adjustment layer. The choice of 'pixel feather' is critical to make sure that the adjustment only applies to the area required. This is really where a small but subtle change can make quite a difference. I don't consider myself to be an artist but there is no question that these small changes are the equivalent of applying the finishing brush strokes to a painting. Poor technique in both cases could ruin a good image, the only advantage of Photoshop is that you can 'step backwards' or delete a layer. With a painting it would be much more difficult if not impossible to undo. Knowing when to stop is also very important. An image can very quickly look overworked. Once all the adjustments had been made all the layers were 'flattened'.  (Layers - flatten image).

The last stage was to apply further sharpening using filters - unsharpen mask. Not all areas of an image require or should be sharpened; the sky for example, so a layer mask should used. I created a duplicate layer of the background layer and applied the sharpening to this new layer so the 'original' background layer remained unaltered. Once I was happy with the amount of sharpening (easily previewed) the  again I 'flattened' both layers. 

Finally I 'saved as' a TIFF file and gave the image a title. Once done this new image is saved in the same folder in Lightroom, so it appears alongside the original image. This is a great advantage as I can still go back and carry out another conversion should I wish.

I think there is still a place for Silver Efex Pro2 in my workflow. After all it has been my default plug in for black and white conversions until now. However my eyes have been opened to new ways of working and I am delighted to have learnt some new skills.

Paul talked about other processing techniques and choices that need to be made before post Processing even starts and I will cover some of these key points in my next entry.


Saturday 23 March 2013

When mono doesn't always work

Although I largely take black and white photographs there are occasions when I will convert a colour RAW file to mono, only to think that the image looks much better in colour. Stripping out colour can eliminate unwanted distractions in a picture, but equally the colours and harmony of these tones can be at the very heart of the image, so why remove them? As I always shoot in RAW I have a digital negative which contains all the colour data, so it gives me the option of a straight mono conversion or working in colour, whichever I think is the best treatment for the image.

During my recent trip to the Lake District there were two shots I really liked and whilst one is fine in black and white, I much prefer the colour version.

Here are both versions by way of comparison - 

Elterwater trees

and now for the colour version -

Elterwater trees in colour
Trees at Elterwater in Langdale

I didn't even consider converting the next shot to monochrome....the colours in the image are just too important in my opinion and make the shot. The warm tones of the foreground contrasting well with the cooler tones in the middle and far distance. These would be lost in a black and white conversion.

Watsons Dodd
Looking towards Watson's Dodd
taken near to the road from Keswick to Thirlemere

This has though made me think. Am I too restrictive in my choice of shot? Should I consider taking more colour images and not be trying to see the world in shades of grey? Surely there is room for both mediums. There can only be a handful of black and white photographers who never shoot in colour. Similarly most photographers who predominately shoot in colour will occasionally take a black and white picture. At the end of the day this is purely a hobby for me, and therefore it's all about the 'taking and making' of images which give me pleasure but hopefully might please others as well. Whether they are black and white or colour doesn't really matter. After all it's simply a matter of personal preference and interpretation.


Sunday 17 March 2013

New Lake District gallery on my website

I launched my website www.alanfrostphotography.co.uk back in January of this year and I have spent some time fine tuning the design as well as creating some galleries. The home page is shown below.

20130317-Home-screen-2.jpg


Following my trip to the Lake District I thought that a selection of the images deserved a gallery in their own right, so this afternoon I updated the website to include twelve images.


20130317-Lake-District-page-2.jpg


Please click on either of the images which link to the relevant page.


Lake District 121 - using filters

In the previous post I wrote about camera technique and in this entry I will cover the use of a variety of different filters to either control exposure or to be a little more creative. Whilst using filters does add another process to the taking of an image, my tutor Paul Gallagher is I believe right in expressing the view that the more you can 'get correct' in the camera when taking the shot, the better the RAW negative is to work with when you reach the stage of post processing. It's also true that some effects simply can't be replicated in Photoshop or for that matter any software; for example the use of a polariser.

In the case of the shot below a 2 stop ND hard grad was used to balance and control the exposure as the sky was much brighter than the foreground. Whilst the shot could have been taken without the filter, there would have been the distinct possibility of either blown highlights in the sky or no detail whatsoever in the shadows, neither of which would have been desirable or recoverable in post processing.


Trees
Trees in Newlands Valley

In the second shot below I used a polariser in order to control the amount of reflection coming off the surface of the water, so that the rocks below would be visible. Had this area of the picture just been black, which would have been possible using the polariser, then the foreground interest would have been lost. Paul reminded me that using a polariser had the same effect as a 2 stop ND filter, therefore increasing the exposure time. In this case the exposure was half a second which I think gave the right amount of movement in the water.


Waterfall by Honister Pass
Waterfall study near Honister Pass


In the next shot I used a 10 stop ND filter to slow the shutter speed right down. In the case of this particular shot the exposure time was 60 seconds at f11. I found that some experimentation was required when taking this type of shot, firstly to get a balanced exposure and secondly to create the desired effect. Using a long exposure does give an ethereal appearance to the water as any ripples become merged and therefore lost, and cloud movement is also evident.


Buttermere
Buttermere

It is of course possible to use a combination of filters but more than two at a time can reduce the sharpness of the image as the optical quality of the filters are good but not that good! In the case of the 10 stop ND filter it also produces a strong blue colour cast which is fine if converting to black and white but may not be so easy to lose in post processing if the end result is a colour image. Another advantage of using this filter is that any people or birds entering and leaving the frame during the exposure may not always be recorded by the sensor. The image below would have suffered had the ducks swimming around at the time been part of the finished result!


Elterwater
Elterwater in Langdale

It perhaps goes without saying that a tripod is an essential piece of photographic equipment. for landscape work. None of these shots could have been taken without one. Adjusting the legs and indeed the tripod head can be time consuming in order to achieve the right composition but it does slow the whole process down, and makes you think about what you are doing. This can only be a good thing - as the tortoise said to the hare!


Friday 15 March 2013

Lake District 121 - camera technique at Wasdale Head

On the first morning of my 121 workshop with Paul Gallagher in The Lake District, Paul was keen to establish my camera technique and the typical settings I used. He was not familiar with the Olympus OMD EM5, as he used a Nikon D800E for his digital work, although his preferred system of choice is medium format 5 x 4 Ebony film camera which I was to see in all it's glory a few days later.

We decided to drive to Wastwater and Wasdale Head.

Wastwater
Wastwater - looking towards Great Gable

I explained that for landscape work I would use the lowest ISO setting available. In the case of the EM5 this was ISO 200. I would also use Aperture Priority. This way the shutter speed would be automatically selected by the camera. I explained that by using 'live view' on the OMD, I would preview the image by showing a 'shadow and highlights' warning; flashing blue for underexposed areas and flashing orange for overexposed areas or blown highlights. I would then use the exposure compensation dial to make any adjustments in order to balance the exposure. If the dynamic range of the shot was too great for the camera sensor, then it might require the use of a neutral density graduated filter to balance the exposure of say a bright sky with a dark foreground. I told him I would tend to rely upon the camera's auto focus, rarely resorting to manual focus.

Believing this was a tried and tested way of taking landscape photographs I was a little taken aback when Paul suggested that it would be much easier to use manual settings for the exposure and to always focus manually. He went on to explain that by setting the aperture to say f11 or f16 to maximise the depth of field, the shutter speed could be adjusted to obtain the optimum exposure setting using the histogram as a guide. He was fully in favour of exposing to the right, but suggested that the histogram should not be right on the point of clipping the highlights, as this would leave no room for finer adjustments when it came to post processing. This made perfect sense to me and the exposure compensation dial would no longer be needed. If the histogram was not acceptable, a quick change to the shutter speed would bring about the desired result.

Wastwater screes
Looking across Wastwater to the Screes

Manual focusing is very straightforward with the EM5. Again in using live view, the instant the focus ring was turned on the lens, the screen would magnify the area of view by a factor of 5x. The amount of magnification can be changed in the settings menu. Using the arrow keys on the back of the camera it was easy to select an area of the composition where pin sharp focusing was critical. This would normally be a subject in the foreground. Having preselected a small aperture opening the depth of field should ensure that the background at infinity would also be in sharp focus.

With the camera on the tripod I used the 2 second timer function so that I could press the shutter button and eliminate any camera movement which would spoil the image. Further I turned off the in camera Image Stabilisation as this can 'fight' the lack of movement of a camera mounted on a tripod and try and 'compensate' for movement when none is actually present. Don't ask me  how or why, or for a technical explanation, just turn the IS off if using a tripod.

Paul was less concerned about setting the aperture to the optimum opening for the lens, which in the case of some my lenses would be f5.6, as this would rarely give the desired depth of field. Don't worry about using a much smaller aperture he said. It's more important that all parts of the image are in focus, even if the lens was not at its very sharpest aperture setting. Again this advise made perfect sense, so I was already benefitting from his knowledge and expertise and it was still only day one.

With photography over for the day but before heading back to our hotel in Keswick, I visited one of the smallest churches in England - St Olaf in Wasdale Head. This church holds special memories for me and in particular the inscription in the glass of a leaded light window. The words are taken from Psalm 121 and the etching is of Napes Needle on Great Gable. A fitting memorial to all mountaineers and climbers who have visited this beautiful part of the world.


20130222-P2220114.jpg
The etching and inscription in St Olaf Church at Wasdale Head


Monday 11 March 2013

Lake District 121 with Paul Gallagher

I realise it's been a few weeks since I posted an entry on this blog. The reason is quite simple. A couple of weeks ago I visited the Lake District for a few days in the company of Paul Gallagher, a renowned UK based landscape photographer who just loves black and white. He is also a Master Printer for Epson; so what he doesn't know about printing just isn't worth knowing! It's also been a very busy time for me personally and I wanted to reflect on what I had learnt before posting my thoughts and any of the images.

The photograph below was taken on the day I arrived in The Lake District before I met up with Paul the next morning. It was late in the afternoon so I had a limited amount of daylight left to take any shots. Blea Tarn was frozen over and I processed the image using a combination of Lightroom and Silver Efex Pro2. As it happens I would not using this plug-in again for post processing.....Paul was about to demonstrate to me the power of Photoshop......so more about this in a future post!

Blea Tarn
Blea Tarn with the Langdale Pikes in the background

The setup for the 121 or personal workshop was to spend two days out and about taking images, learning about camera technique, camera settings, composition, histogram and the use of filters etc. The third day would be spent back at his studio processing the images and producing large A3+ size prints. In essence I was keen to bridge the gaps between camera work in the field, processing and printing. In other words to develop a work flow whereby my photographic thinking or pre-visualisation at the time of taking the shot would be influenced by how I wanted the final image to look once processed and printed back in the 'digital' darkroom. The aim would be to combine the three elements into one, as opposed to treating them as distinctly separate processes where coherent thinking doesn't overlap.

This will therefore be the first of a series of probably quite short posts about the various topics which we covered over the three days, including of course, some of the images taken. I should add that I had an extra day free in the middle of the 121, which gave me time to put into practice some of the techniques and ideas we had talked about in the first two days. In my opinion this was invaluable, as I could take some shots unsupervised by Paul before returning to his studio. He also set me a few challenges.....would I succeed or would I fail?